A pipe saddle, sometimes called a fish-mouth, is the curved cut made on the end of a branch pipe so it fits tightly against a larger header pipe.
The easiest way to understand saddle layout is this: divide the branch pipe into degrees, calculate how deep the cut needs to be at those points, then connect the marks with a smooth curve.
This article explains the basic math without making it more complicated than it needs to be.
Start With the Actual Pipe Outside Diameter
Do not use nominal pipe size for your calculations.
Use the actual outside diameter, or OD.
For example, a 6-inch nominal pipe has an actual outside diameter of:
6.625 inches
Once you know the OD, find the radius:
Radius = OD ÷ 2
So for a 6.625-inch OD pipe:
6.625 ÷ 2 = 3.3125 inches
You will need the radius of both the branch and the header.
Find the Branch Circumference
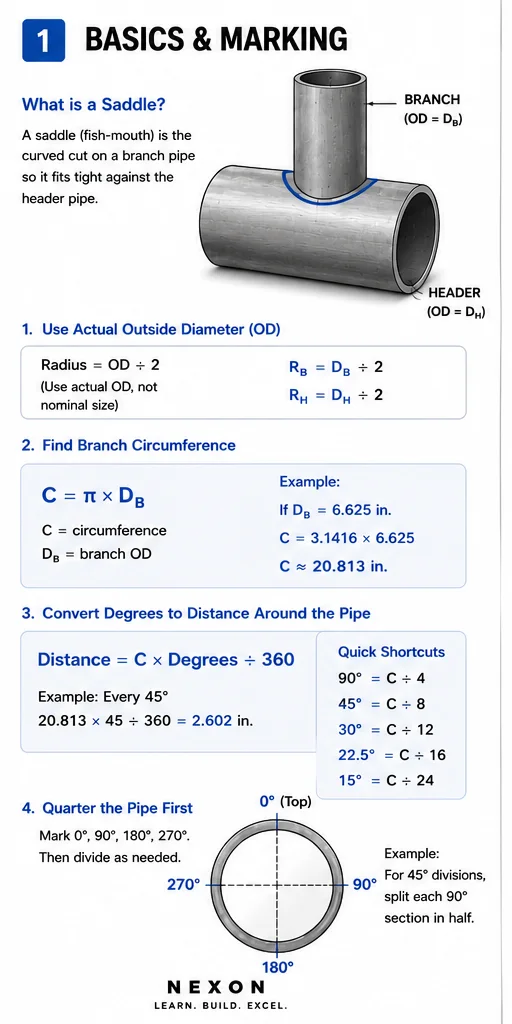
Circumference tells you the total distance around the pipe.
Use:
C = π × D
where:
C = circumference
D = outside diameter
π = 3.1416
For a 6.625-inch OD branch:
C = 3.1416 × 6.625
C ≈ 20.813 inches
That means one complete trip around the pipe is about:
20.813 inches
Convert Degrees Into Inches Around the Pipe
A complete circle is:
360°
That means you can convert any angle into a distance around the pipe.
Use:
Distance = Circumference × Degrees ÷ 360
For example, if the branch circumference is 20.813 inches and you want to mark every 45°:
20.813 × 45 ÷ 360
= 2.602 inches
So every 45° mark is about:
2.602 inches apart
You can also remember these quick shortcuts:
90° = circumference ÷ 4
45° = circumference ÷ 8
30° = circumference ÷ 12
22.5° = circumference ÷ 16
15° = circumference ÷ 24
These shortcuts are extremely useful in the field.
Quarter the Pipe First
A simple way to keep the layout accurate is to mark the pipe in quarters first.
Mark:
0°
90°
180°
270°
Then divide those sections if you need more layout points.
For example, if you want 45° divisions, split each 90° quarter in half.
If you want 22.5° divisions, split each 45° section in half again.
This helps prevent small measuring errors from adding up around the pipe.
Basic Saddle-Depth Formula
For a standard 90° branch entering the center of a header, use:
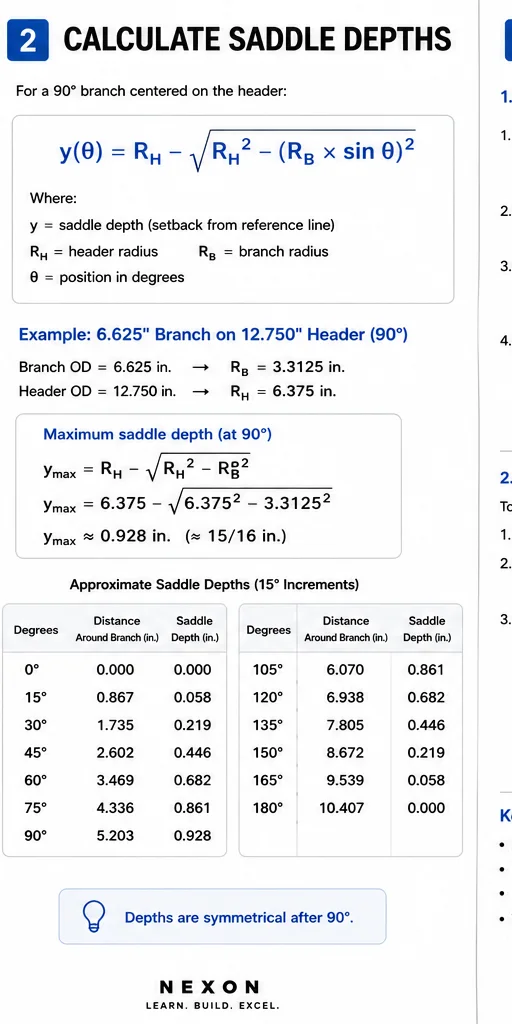
y = Rₕ − √[Rₕ² − (Rᵦ × sin θ)²]
where:
y = saddle depth
Rₕ = header radius
Rᵦ = branch radius
θ = degree position around the branch
You do not necessarily need to memorize this formula.
The important thing is understanding what it does.
It tells you how far back to measure from your square reference line at each point around the branch.
Simple Example
Let’s use:
Branch OD = 6.625 inches
Header OD = 12.750 inches
First find the radii.
Branch radius:
6.625 ÷ 2 = 3.3125 inches
Header radius:
12.750 ÷ 2 = 6.375 inches
Now calculate the deepest part of the saddle.
Use:
Maximum depth = Rₕ − √(Rₕ² − Rᵦ²)
So:
6.375 − √(6.375² − 3.3125²)
This gives approximately:
0.928 inch
So the deepest part of the saddle is about:
15/16 inch
That gives you a quick idea of how deep the cut will be before you lay out all the points.
Basic Saddle Layout Points
For this same example, some approximate depths are:
Position
Saddle Depth
0°
0.000”
15°
0.058”
30°
0.219”
45°
0.446”
60°
0.682”
75°
0.861”
90°
0.928”
After 90°, the pattern begins reversing.
So:
105° matches 75°
120° matches 60°
135° matches 45°
150° matches 30°
165° matches 15°
180° returns to 0
That symmetry makes a standard 90° saddle much easier to lay out.
How to Mark It on the Pipe
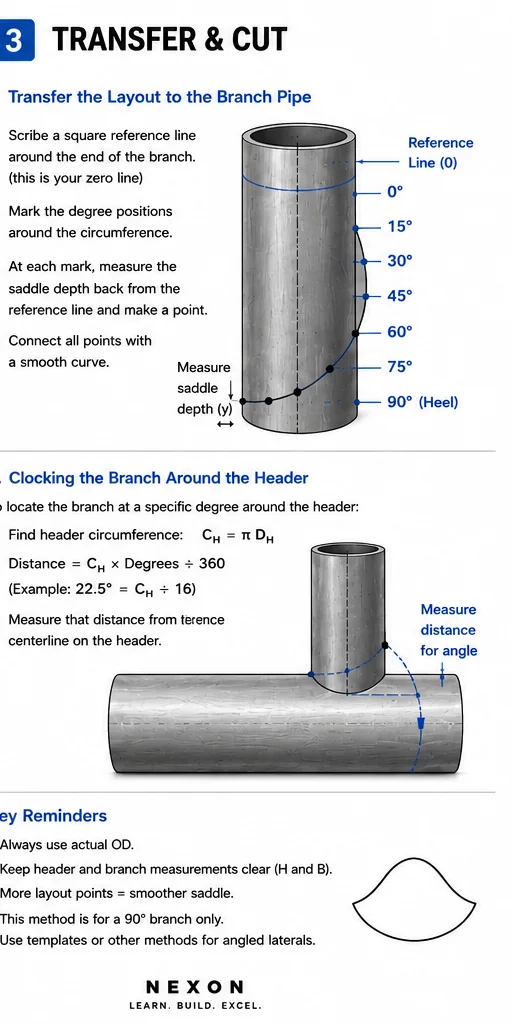
Start by making a square reference line around the end of the branch pipe.
Next, mark your degree positions around the branch circumference.
At each degree mark, measure the correct saddle depth back from the reference line.
Make a small mark.
Continue all the way around the pipe.
Once all the marks are in place, connect them with a smooth curve.
That curve becomes your cut line.
Use a Wraparound
A wraparound makes the job much easier.
Use it to create a square reference line around the pipe and to help establish straight longitudinal centerlines.
Once you have a good reference, the rest of the layout is just measuring.
Good saddle layout depends heavily on good reference lines.
Do Not Use Nominal Pipe Size
This is one of the biggest mistakes people make.
Do not calculate a 6-inch pipe as though its outside diameter is exactly 6 inches.
Use the real OD.
Your circumference, radius and saddle-depth calculations all depend on the actual pipe diameter.
Wrong OD means wrong saddle.
Do Not Mix Up Header and Branch Measurements
Keep the two pipes clearly labeled.
The branch circumference is used to mark positions around the branch.
The header radius is used to calculate how much curvature the branch must follow.
A simple way to keep things straight is:
H = Header
B = Branch
Write those beside your measurements before you start calculating.
More Marks Mean a Smoother Saddle
You can lay out a saddle with only a few points, but more points give you a more accurate curve.
For rough work, larger degree divisions may be enough.
For more precise work, use smaller divisions such as:
30°
22.5°
or:
15°
The goal is not to create hundreds of marks.
You just want enough points to draw a smooth, accurate curve.
Clocking the Branch Around the Header
Saddle shape and branch location are not the same calculation.
If the branch needs to be located 22.5° around the header, first calculate the header circumference.
Then use:
Distance = Header Circumference × 22.5 ÷ 360
Because 22.5° is exactly 1/16 of a circle, you can also simply use:
Header circumference ÷ 16
That tells you how far around the header to measure from your reference centerline.
So remember:
Clocking tells you where the branch goes.
Saddle layout tells you how the branch fits.
Important Note About Angled Branches
Everything in this article is for a standard:
90° branch-to-header connection
A 45° lateral, 60° lateral or another odd-angle branch has a different saddle shape.
Do not use this 90° saddle formula for an angled lateral.
The geometry changes.
Simple Formula Sheet
These are the main formulas worth keeping:
Radius
R = D ÷ 2
Circumference
C = πD
Degrees to distance around pipe
Distance = C × Degrees ÷ 360
Maximum saddle depth
Maximum depth = Rₕ − √(Rₕ² − Rᵦ²)
Saddle depth at any point
y = Rₕ − √[Rₕ² − (Rᵦ × sin θ)²]
The Simple Field Method
For a standard 90° saddle, the process is straightforward.
Confirm the actual OD of both pipes. Find the branch circumference and the radius of both pipes. Mark your degree positions around the branch. Calculate the saddle depth at each position. Measure those depths back from a square reference line. Connect the marks with a smooth curve. Check your layout before cutting.
That is really what saddle layout comes down to.
Circumference tells you where to mark.
The saddle-depth formula tells you how far back to mark.
The smooth curve between those marks gives you the cut.
Once you understand those three ideas, laying out a standard pipe saddle becomes much easier.