The root pass is where a TIG pipe weld is won or lost.
The cap may be what everyone sees, but the root establishes the foundation of the entire weld. On an open-root pipe joint, the welder has to control penetration, fusion, heat, filler metal and the root opening—all while moving through changing positions around the pipe.
There isn’t just one way to do it.
Three techniques you’ll commonly hear discussed in TIG pipe welding are keyhole control, lay-wire, and dab feeding. They overlap in some applications, and welders often develop variations of each, but understanding the fundamentals gives you a much better idea of what is actually happening inside the joint.
1. Keyhole Root Technique
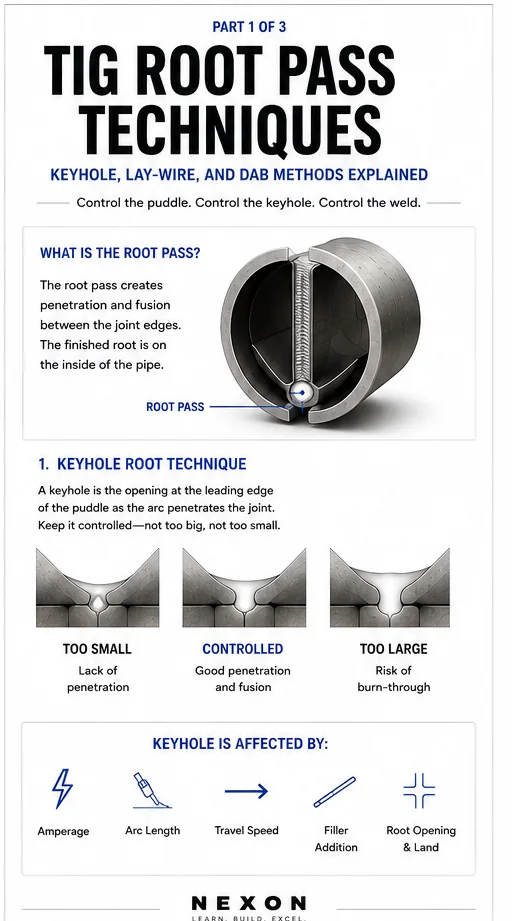
A keyhole is the opening that develops at the leading edge of the molten weld pool as the arc penetrates through an open-root joint.
It gives the welder visual feedback about what is happening through the wall of the pipe.
The objective isn’t to make the biggest keyhole possible.
The objective is to keep it controlled.
If the keyhole grows too large, the root can become difficult to control and excessive penetration or burn-through may result.
If it closes completely when the procedure requires an open keyhole, fusion and penetration may become inadequate.
The welder is constantly reading that opening.
What Controls the Keyhole?
Several variables work together:
Amperage affects how quickly the joint edges melt.
Arc length changes the concentration and behavior of the arc.
Travel speed determines how long heat remains in one area.
Filler addition helps control the molten puddle and contributes material to the root.
Root opening and land determine how the joint responds to the heat.
A TIG welder therefore isn’t simply moving a torch around a pipe.
They’re continuously balancing these variables.
Reading the Keyhole
Imagine progressing along an open-root joint.
The keyhole is maintaining a predictable size.
Everything feels stable.
Then the root gap begins getting wider.
If nothing changes, the same heat and travel technique may suddenly produce much more penetration.
The welder has to recognize the change before the puddle gets away.
Likewise, if the gap becomes tighter, the welder may need to adjust technique to maintain proper fusion.
This is why good fit-up makes welding easier, but good welders still need to understand how to react when fit-up changes.
2. Lay-Wire TIG Root Technique
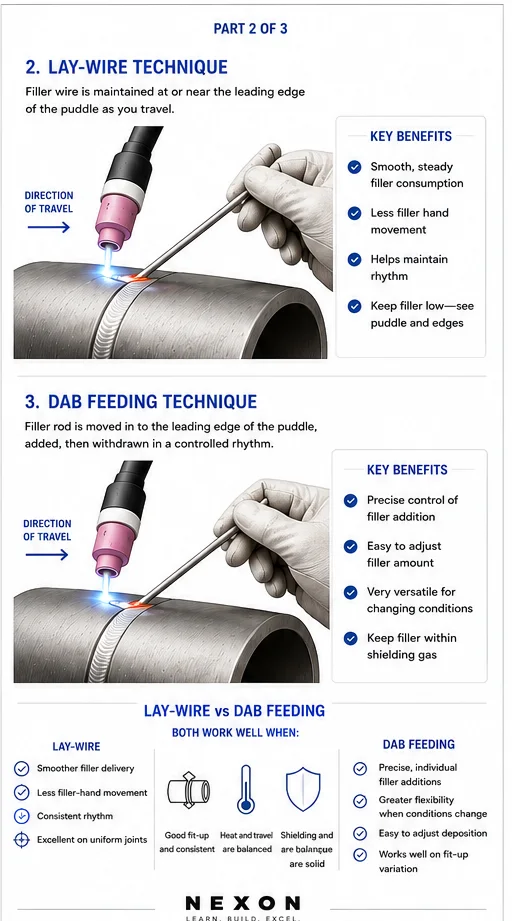
With a lay-wire technique, the filler wire is maintained at or very near the leading portion of the weld puddle rather than repeatedly being moved completely in and out.
The arc melts the joint edges while the filler is progressively consumed into the puddle.
When performed correctly under an appropriate welding procedure, this can create an extremely smooth and controlled root.
One advantage is rhythm.
The welder doesn’t have to coordinate a large repetitive filler-wire motion while simultaneously controlling the torch.
Instead, torch movement, travel and filler consumption work together.
Filler Position Matters
“Lay-wire” doesn’t mean randomly laying filler into the groove.
Where the filler sits relative to the arc and puddle matters.
The welder needs to see:
- Both joint edges
- The molten puddle
- The root opening
- How the filler is melting
- Where the arc is directing heat
If the filler obstructs visibility or is positioned poorly, controlling the root becomes much more difficult.
The wire should support puddle control—not hide what’s happening.
Why Welders Like Lay-Wire
Once mastered, lay-wire can feel extremely smooth.
There is less dramatic movement with the filler hand.
That can make it easier to concentrate on torch position and puddle behavior.
It can be particularly effective when the joint preparation and root opening are consistent.
But that’s also important:
The technique doesn’t compensate for every fit-up problem.
A joint that suddenly changes may still require the welder to change travel speed, filler input, torch position or another permitted variable.
3. Dab-Feeding the Root
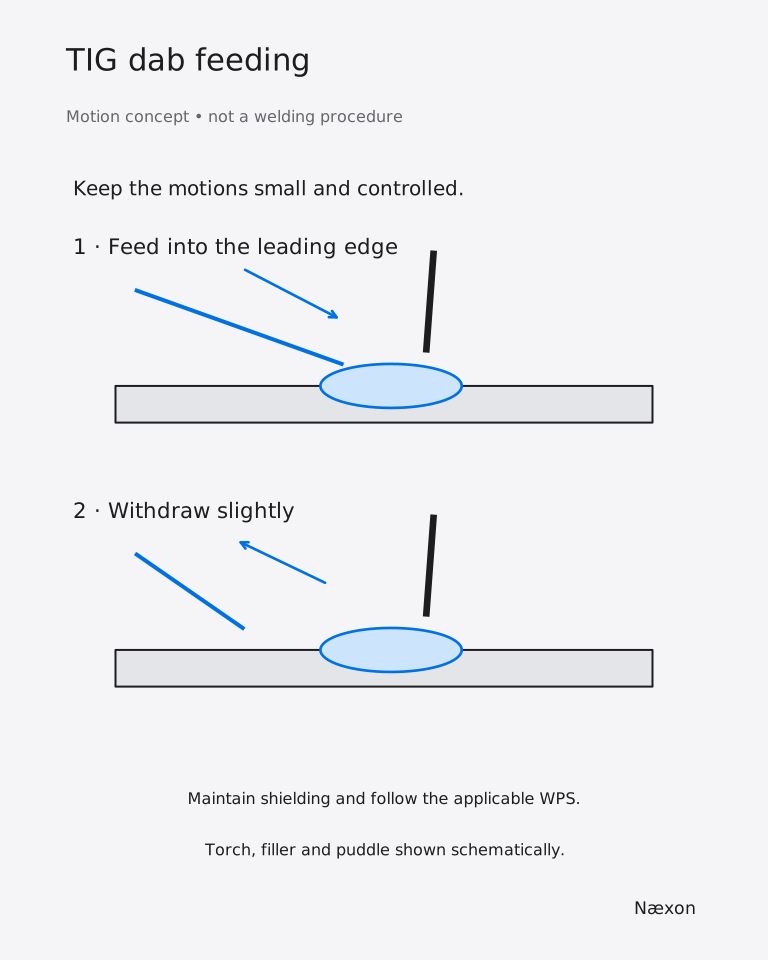
Dab feeding is the technique most people associate with traditional TIG welding.
The filler rod approaches the leading portion of the puddle, deposits filler, moves back and then returns.
The rhythm becomes:
Move → Dab → Move → Dab → Move → Dab
But the actual motion can be extremely small.
Experienced welders generally aren’t waving the filler rod several inches in and out of the weld.
The movement is controlled and efficient.
Why Dab?
Dab feeding gives the welder very deliberate control over how much filler enters the puddle.
If a particular area requires slightly more filler, the welder can respond.
If conditions change, the filler rhythm can change with them.
That makes dab feeding extremely versatile.
The downside is coordination.
Your torch hand is controlling the arc while your other hand independently feeds filler.
Both hands have to work together.
Don’t Pull the Filler Out of the Shielding Gas
A common beginner mistake is withdrawing the hot end of the filler rod too far from the shielding-gas envelope between additions.
The end can oxidize.
Then that contaminated or oxidized end is repeatedly introduced back toward the molten weld pool.
Instead, filler movement should remain controlled, and cleanliness should always be protected according to the material and welding procedure.
This becomes particularly important with materials such as stainless steel.
Lay-Wire vs Dab Feeding
Neither method is automatically superior.
Lay-Wire
Can provide:
- Smooth filler delivery
- Reduced filler-hand movement
- Consistent rhythm
- Excellent control on uniform joints
Dab Feeding
Can provide:
- Precise individual filler additions
- Greater flexibility when conditions change
- Easy adjustment of deposition
- Independent control of filler timing
Experienced welders may use variations of both.
Some even transition between techniques during the same weld when the qualified procedure and conditions allow it.
Torch Movement During the Root
The torch doesn’t necessarily need a huge side-to-side movement.
The arc needs to establish proper fusion where it is required.
Excessive manipulation can unnecessarily increase the heated area and make puddle control more difficult.
Think about what you’re trying to accomplish:
Fuse the first side → control the opening → fuse the second side → add filler → advance.
The exact movement depends on the joint and procedure.
The puddle should dictate the motion—not a desire to create a particular ripple pattern.
The Bottom of the Pipe
The bottom section is where many welders initially struggle.
Body position becomes awkward.
Visibility changes.
Filler feeding becomes uncomfortable.
Gravity affects the puddle differently.
The solution begins before striking the arc.
Position yourself so your hands can move through the entire section you’re about to weld.
Ask yourself:
Can my torch hand finish this section without locking my wrist?
Can my filler hand reach the entire section?
Can I see the keyhole?
If the answer is no, reposition before starting.
Moving Up the Side
As you progress around fixed pipe, the relationship between your body and the joint continuously changes.
A technique that felt comfortable near the bottom may require adjustment as you approach the side.
This is where experienced pipe welders develop smooth body movement.
They’re not just welding with their fingers.
They’re positioning their:
Hands → wrists → elbows → shoulders → body
to keep the torch stable.
Approaching the Top
Near the top of the pipe, the puddle may feel completely different from the bottom.
The welder still needs to maintain consistent penetration and tie into the existing root.
Don’t allow the desire to finish quickly to change travel speed dramatically.
The final portion deserves the same attention as the first.
Starting and Stopping the Root
Starts and stops deserve special attention.
When stopping, the weld should be terminated in a manner that allows a sound restart according to the applicable procedure.
Before restarting, the termination may need preparation.
The objective is to avoid creating a weak transition between the previous weld and the new section.
When restarting, establish fusion into the existing root before progressing into unwelded joint.
A restart shouldn’t look like two unrelated welds meeting each other.
It should become one continuous root.
Tack Welds
Tacks are another critical area.
A tack isn’t something you simply run over without paying attention.
The welder needs to ensure proper tie-in.
Depending on the procedure and condition of the tack, preparation may be necessary.
The transition should allow the root pass to fuse smoothly through the area without leaving defects.
Good tack preparation can make the root significantly easier.
What About Walking the Cup?
Walking the cup and filler technique shouldn’t be confused as the same thing.
Walking the cup describes primarily how the torch is manipulated and supported.
Lay-wire and dab feeding describe how filler metal is introduced.
A welder may combine different torch and filler techniques where the welding procedure permits.
That’s why learning TIG as a collection of independent skills is useful.
You have:
Torch control
Arc-length control
Puddle control
Filler control
Heat control
Travel control
Put them together and you have a welding technique.
Carbon Steel Roots
Carbon steel is commonly used for learning open-root TIG because puddle behavior can be relatively easy to observe.
The welder can concentrate on understanding penetration and keyhole control.
But don’t confuse “more forgiving” with “anything goes.”
Joint preparation, cleanliness, filler selection, shielding gas, parameters and welding procedure still matter.
Stainless Steel Roots
Stainless changes the game.
Now the inside of the pipe becomes especially important because the backside of the root may require shielding from atmospheric contamination.
This is where purging enters the process.
A beautiful external root technique means very little if the backside is heavily oxidized because shielding was inadequate.
Stainless also demands excellent cleanliness and heat control.
The welder needs to think about the entire weld—not merely the visible puddle.
Common Root-Pass Problems
Keyhole Getting Too Large
Possible contributors include excessive heat input, slow travel, changing root opening or excessive arc length.
Don’t blindly continue welding.
Read what the joint is telling you.
Keyhole Closing
The joint may be getting tighter, travel may be too fast, heat may be insufficient, or torch placement may have changed.
Again, determine the cause rather than automatically increasing amperage.
Tungsten Contamination
Touching the tungsten to the puddle or filler can contaminate it.
Stop and correct the tungsten according to proper practice rather than continuing with a compromised electrode.
Inconsistent Penetration
This often indicates inconsistent heat, travel, arc length, filler addition, joint geometry—or a combination of them.
Consistency is everything.
The Root Bead Should Not Be Judged From the Outside Alone
This is one of the most important lessons in TIG pipe welding.
The outside can look beautiful while the inside tells a completely different story.
The root’s purpose is not to impress someone looking at the exterior.
It needs to satisfy the requirements of the weld.
That means adequate fusion, acceptable penetration and compliance with the applicable welding procedure and acceptance criteria.
Which Root Technique Should You Learn First?
Learn the fundamentals before becoming loyal to one technique.
Understand how to establish a puddle.
Learn how changing arc length affects it.
Learn how filler changes it.
Learn what happens when travel speed increases or decreases.
Learn to recognize changes in the keyhole.
Then practice lay-wire.
Practice dab feeding.
Practice freehand.
Practice cup-supported techniques where permitted.
Eventually the goal isn’t:
“I know how to lay-wire.”
The goal is:
“I understand what the puddle is doing and know how to control it.”
That’s the difference between memorizing a motion and learning how to weld pipe.
Safety and Procedure Come First
TIG pipe welding should always be performed according to the applicable welding procedure specification, employer requirements, project specifications and safety rules.
Parameters and techniques vary with material, wall thickness, joint preparation, filler metal, shielding gas, position and code requirements.
There is no universal amperage, gap, land, tungsten stick-out or filler technique appropriate for every pipe weld.
Use the qualified procedure for the work you’re actually performing.
The Skill Is in Reading the Puddle
Keyhole, lay-wire and dab feeding are tools.
None of them replaces understanding.
An experienced TIG pipe welder can recognize when the root opening changes, when the puddle becomes too fluid, when filler needs adjustment and when body position is about to compromise torch control.
That’s what separates simply copying a hand motion from actually understanding the process.
Don’t just learn the pattern. Learn what the puddle is telling you.