The crew leaves a hydrotest holding pressure at the end of the shift. The next morning, the gauge reads lower. Did the test fail?
A falling gauge reading deserves an investigation, but the number alone does not tell you where the pressure went. The test water may have cooled, trapped air may still be affecting the reading, the test setup may be leaking, or the piping itself may have a leak. The way to find out is to compare the pressure record with the conditions around the test, then inspect the entire test boundary.
Start With the Test Record
Before touching the pump, write down the starting and current pressure, the times of both readings, and the gauge location. Record the water temperature if it was measured, along with ambient conditions and any major weather change overnight. Confirm that the same gauge was used and that its range and calibration are suitable for the test.
A single reading at the end of the day and another the next morning leave too much unexplained. A pressure chart or regularly logged readings show whether the drop was gradual, sudden, or tied to a change in temperature.
Check Temperature Before Calling It a Leak
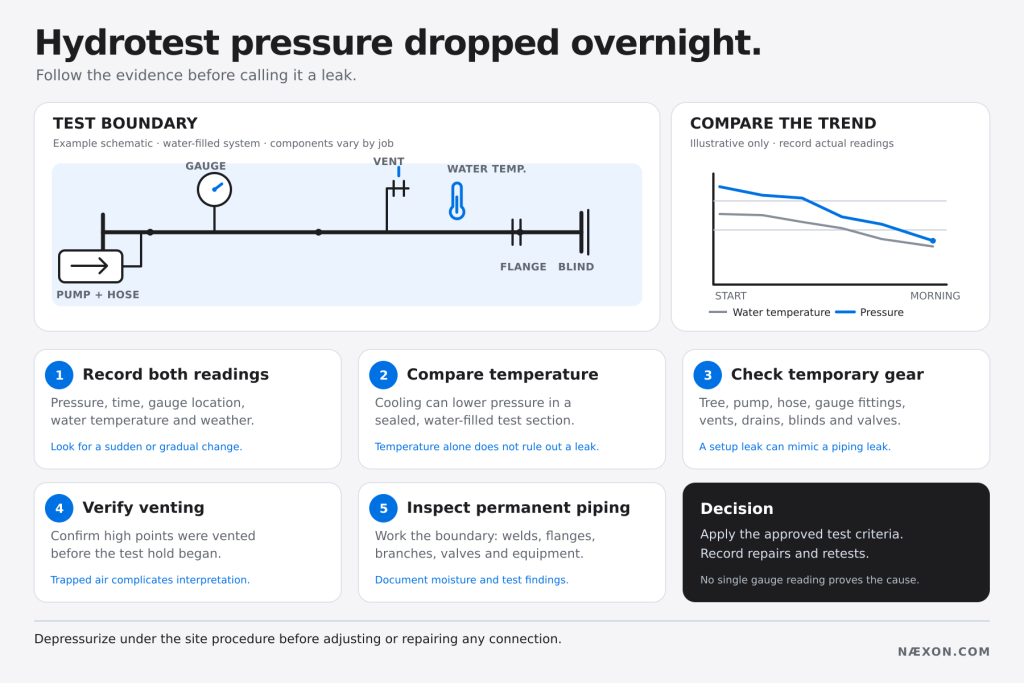
Figure caption: An overnight hydrotest pressure drop has several possible causes. Record the pressure and water temperature, inspect the temporary test setup, confirm venting, and check the piping before evaluating the result against the approved test procedure.
Water and pipe respond to temperature changes. If a closed, water-filled test section cools overnight, its pressure can fall even when no water escapes. Sun on exposed pipe can cause the opposite effect during the day.
That does not mean every overnight drop is “just temperature.” The effect depends on the test section, its material, the amount of water, and the actual change in water temperature. Air temperature alone is a poor substitute for a water-temperature reading. The test engineer should evaluate temperature-related pressure changes under the approved test procedure before anyone accepts or rejects the test.
Inspect the Test Setup First
The leak may be outside the permanent piping. Check the hydrotest tree, pump connections, hoses, gauge fittings, vents, drains, temporary blinds, threaded joints, and valve boundaries. Look for visible moisture and signs that a valve is passing into another part of the system.
Do not tighten a fitting or disturb a test boundary while it is pressurized. Follow the site’s isolation and depressurization procedure before making repairs. Once a defect is corrected, repeat the required test sequence.
Consider Trapped Air
Air left at a high point makes the test section behave differently from a fully water-filled system. It compresses as pressure rises and can make pressure readings harder to interpret. Confirm that the fill and vent procedure was completed and that designated high points were vented before the hold period began.
If trapped air is suspected, stop and follow the approved procedure for depressurizing, venting, refilling, and restarting the test. Do not treat an uncertain pressure reading as proof of a sound system.
Then Inspect the Permanent Piping
Follow the test boundary methodically: welds, flanges, threaded connections, branch connections, valve packing, and any equipment included in the test. A slow leak may leave only a small wet spot or stain. On insulated or concealed sections, the inspection plan may need additional attention because a leak may not be visible at the point where it starts.
Compare what the crew finds with the pressure trend. A sudden drop calls for a prompt check of the boundary and test equipment. A gradual drop needs the same investigation, with temperature and test-section behavior considered alongside the physical inspection.
Who Decides Whether the Test Passes?
The approved test package controls the pressure, hold period, inspection requirements, allowable variation, and retest process. Those requirements can differ by piping system and governing code. The crew should document the readings and findings, then have the responsible test authority evaluate the result. Never raise the pressure, add water, or reset the clock simply to make the chart look acceptable unless the procedure directs it and the action is recorded.
The takeaway: an overnight pressure drop is a finding, not a diagnosis. Record the conditions, check the temporary setup, verify venting, inspect the piping, and let the approved test criteria determine the result.
For a closer look at the equipment involved, read Næxon’s articles on the hydrotest tree and how a hydrotest pump works.
Technical basis checked against hydrostatic testing guidance from the Plastics Pipe Institute and pipeline integrity guidance from PHMSA. Test acceptance remains specific to the approved procedure for the system.