Some of the most useful tools in pipefitting never came out of a factory.
They were built in fabrication shops, gang boxes, maintenance shops, and jobsite laydown yards because somebody needed a better way to do a job with the material they already had.
The jack stand pipe clamp is a perfect example.
A regular pipe jack stand does a great job supporting pipe, but support and restraint are two different things. A piece of pipe sitting on a jack can still roll, move, lift, or shift while you’re fitting it. Add a simple shop-fabricated clamp, and that same jack becomes a much more controlled workholding setup.
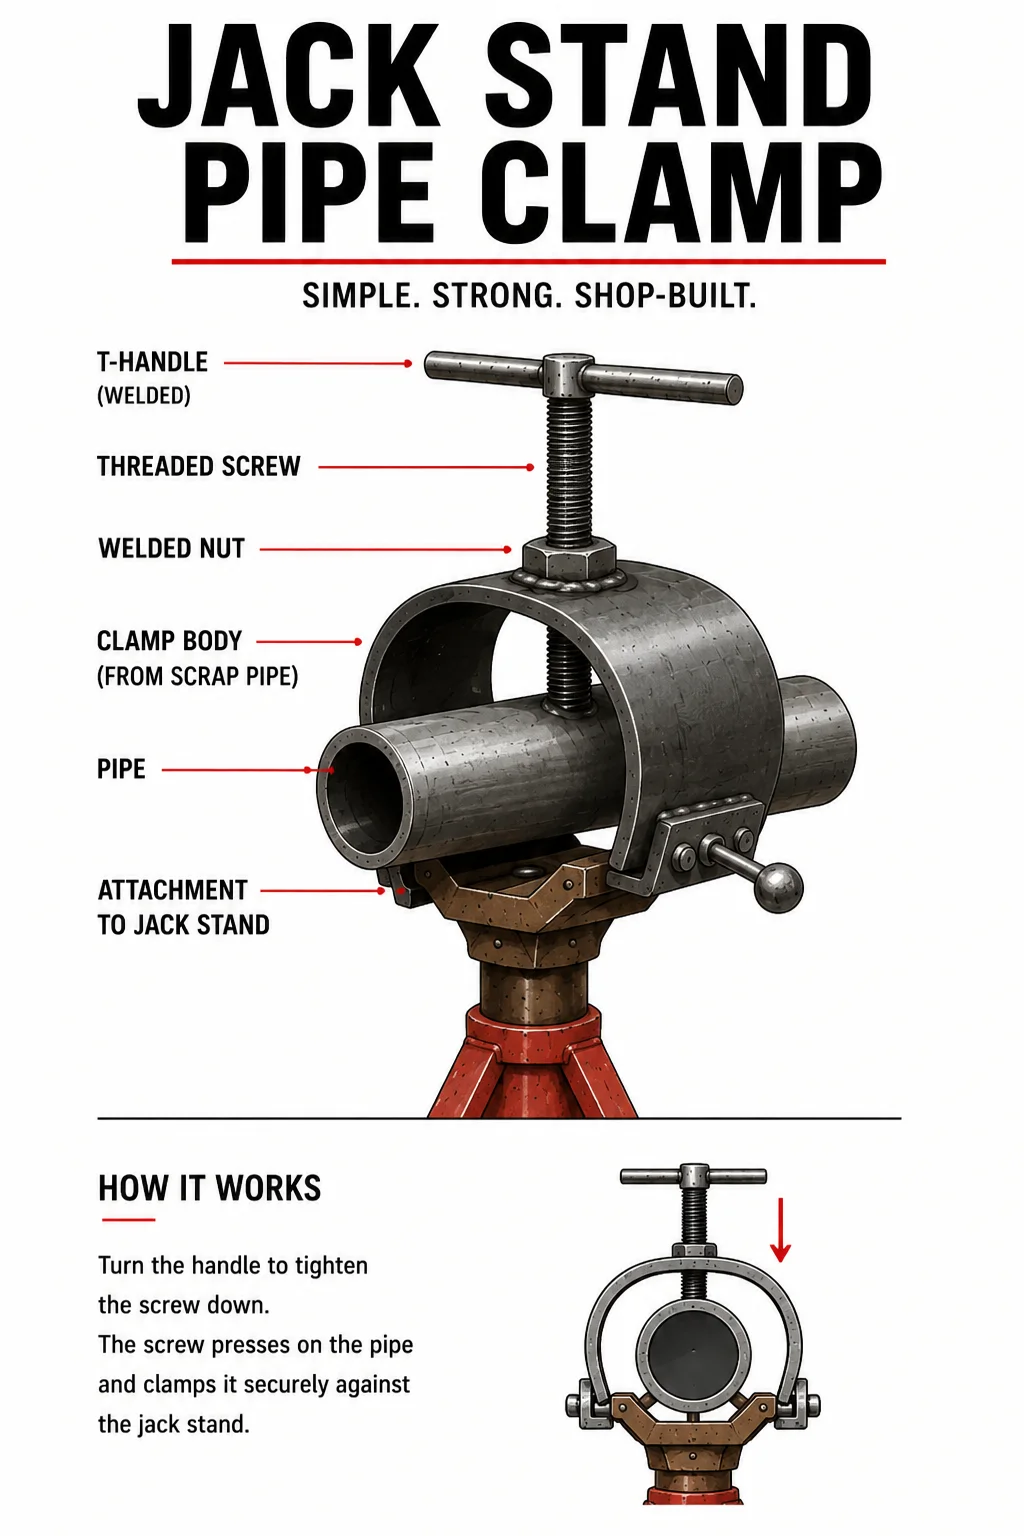
The basic design is surprisingly simple: a curved piece of steel made from scrap pipe, a heavy threaded nut, a threaded screw, and a welded handle.
But simple doesn’t mean useless.
For a fitter trying to hold pipe steady while making measurements, checking alignment, laying out a fit, or performing other permitted fabrication work, this little homemade attachment can earn its place in the gang box.
What Is a Jack Stand Pipe Clamp?
A jack stand pipe clamp is a removable or semi-permanent clamping attachment fabricated to work with a conventional pipe jack stand.
Think of it as a steel saddle that comes over the top of the pipe.
The jack stand supports the pipe from underneath. The fabricated clamp surrounds the upper portion of the pipe, and a threaded screw passes vertically through the top of the clamp.
Turn the handle and the screw travels downward.
The end of the screw contacts the pipe and applies pressure against it. Because the jack stand is supporting the opposite side, the pipe becomes captured between the screw and the stand.
Instead of simply resting on the jack, the pipe is now restrained at the jack.
That distinction is what makes this tool useful.
Why Pipefitters Build These Instead of Buying Them
Industrial jobsites have always had a culture of tool fabrication.
If you’ve spent enough time around experienced pipefitters and welders, you’ve probably seen homemade dogs, wedges, strongbacks, pipe stands, alignment tools, spacing tools, clamps, and dozens of other devices that don’t necessarily have an official name.
The philosophy is simple:
If you need a tool and you can safely fabricate it, build it.
The jack stand clamp fits directly into that tradition.
Most fabrication shops already have the basic materials required. An old piece of sufficiently heavy-wall pipe can become the clamp body. A suitable nut or threaded coupling becomes the screw boss. A threaded screw provides the clamping force. A short piece of round bar can become the handle.
The result is an inexpensive tool that can make a standard jack stand significantly more useful for certain controlled fabrication and fitting operations.
For more industrial fabrication, pipefitting, welding, and skilled-trade content, visit the Næxon Resources Center.
How the Jack Stand Pipe Clamp Works
The principle is extremely simple.
Imagine the pipe sitting normally on the jack stand.
Without a clamp, gravity is primarily keeping it there. Depending on the pipe’s diameter, length, balance, slope, and what you’re doing to it, the pipe can potentially rotate or shift.
Now place a heavy curved steel saddle over the pipe and secure that saddle to the jack stand.
At the center of the saddle is a threaded screw.
Turning the screw clockwise drives it downward until it contacts the pipe.
Continue tightening and three things work together:
The jack stand supports the pipe from below.
The clamp body prevents the pipe from freely escaping upward or sideways.
The threaded screw applies controlled downward pressure.
That turns the jack from a simple support into a basic clamping station.
It is essentially the same mechanical principle found in countless shop clamps: a rigid frame reacts against the force produced by a screw.
The Main Components
You don’t need a complicated collection of parts.
The basic tool consists of:
- Curved steel clamp body
- Heavy threaded nut or threaded boss
- Threaded screw or rod
- T-handle or L-handle
- Attachment points for the jack stand
- Optional pressure pad on the end of the screw
The exact dimensions should be determined by the jack stand, pipe sizes, materials, loads, and intended work. There should not be one universal set of dimensions copied blindly from somebody else’s tool.
This is a shop-built workholding accessory, not engineered lifting or rigging equipment.
The Clamp Body
The most recognizable part of the tool is the curved outer shell.
One of the easiest ways to make it is from scrap pipe.
Start with a pipe diameter large enough that a section of its wall can form a saddle around the pipe sizes you intend to work with.
Instead of trying to bend thick flat bar perfectly into a semicircle, you’re taking advantage of a shape that already exists.
Cut a section from the scrap pipe and remove enough material to produce the open clamp body.
When viewed from the end, the finished piece resembles a large C or an inverted U.
The opening needs to provide enough clearance to position the clamp around the workpiece and jack while maintaining enough steel around the top and sides to resist deformation.
Avoid making the shell unnecessarily thin.
The threaded screw can generate substantial force. A flimsy clamp body may distort long before the screw or nut fails.
Step 1: Start With the Jack Stand
Before cutting anything, look at the actual jack stand you intend to use.
Measure:
- Width of the jack head
- Shape of the support
- Maximum pipe diameter you expect to clamp
- Required clearance around the pipe
- Location where the clamp will attach
- Centerline of the pipe when sitting on the stand
The screw needs to come down approximately over the pipe’s centerline.
Poor alignment can cause the screw to push the workpiece sideways instead of simply restraining it.
A good fitter builds the clamp around the actual stand—not around guessed dimensions.
Step 2: Select the Scrap Pipe for the Clamp Body
Find a piece of scrap steel pipe large enough to create the outer shell.
Heavy-wall material is preferable to thin material because the body has to resist the force created by the screw.
Lay out the portion you’re going to remove.
The objective is to create a curved section that reaches around the pipe while leaving the bottom sufficiently open to fit over the jack stand.
Don’t immediately cut everything to final dimensions.
Leave yourself extra material.
It’s much easier to trim another 1/4 inch than weld 1/4 inch back onto the clamp.
Step 3: Cut the Clamp Body
Cut the scrap pipe to the required width.
Then make the longitudinal cuts needed to open the section.
After cutting, remove sharp edges, slag, burrs, and corners.
At this stage, test-fit the unfinished body over the jack stand.
Set a representative piece of pipe on the stand and place the clamp around it.
Look at the geometry before welding anything permanently.
You want adequate clearance while keeping the assembly compact.
Step 4: Fit the Clamp to the Jack Stand
This is where fabrication judgment matters.
The bottom of the curved shell needs to interface properly with the jack.
Depending on the stand design, you may fabricate tabs, ears, stops, pins, or another positive attachment arrangement.
The important point is that the body must remain stable when screw pressure is applied.
You don’t want the entire clamp rotating when you turn the handle.
Tack the components first.
Then install the clamp on the jack and check it again.
Put pipe in the stand.
Look from the side.
Look from the end.
Make sure everything is centered before final welding.
This same habit of checking geometry before committing to a weld is fundamental throughout pipe fabrication. Næxon’s industrial workwear guide also covers the demanding environments where fitters, welders, millwrights, and other trades perform this kind of work.
Step 5: Locate the Pressure Screw
With the pipe sitting in its normal position, mark the centerline at the top of the clamp.
This is where the threaded screw will be located.
Ideally, the screw should push approximately toward the center of the pipe rather than contacting it significantly off-center.
Drill or cut the required opening through the clamp body.
The hole itself doesn’t necessarily provide the working threads.
A common shop-built arrangement is to weld a heavy nut or suitable threaded boss over the opening.
The screw then threads through that component.
This gives you significantly more thread engagement than simply tapping a thin section of the curved shell.
Step 6: Install the Threaded Nut or Boss
Center the nut over the hole.
Thread the screw through it temporarily before welding.
This is a useful fabrication trick because the screw helps keep the nut aligned with the opening.
Tack the nut.
Remove or protect the threaded component as appropriate for the welding procedure so weld spatter or distortion doesn’t ruin the threads.
Then complete the weld according to the material and fabrication requirements.
After everything cools, verify that the screw travels smoothly through the entire working range.
If the screw binds, don’t force it.
Determine whether the threads were contaminated, distorted, or misaligned.
Step 7: Make the Pressure Screw
Now you need the part that actually moves.
Use an appropriately sized threaded screw or threaded rod suited to the intended application.
The screw must be long enough to accommodate the range of pipe sizes the clamp is designed around.
Too short and it won’t reach smaller pipe.
Excessively long and you’ve created an awkward handle sticking far above the stand.
The goal is useful adjustment without unnecessary length.
Run the screw through the welded nut and verify the travel.
It should move freely without excessive looseness.
Step 8: Fabricate the Handle
The screw needs a handle so the fitter can turn it without constantly reaching for a wrench.
There are two common approaches visible on shop-built versions of this tool.
One is an L-handle.
A short piece of round bar is welded across or into the top of the screw so it extends primarily to one side.
The other is a T-handle.
A piece of round bar passes across the top of the screw, giving the fitter leverage from either direction.
The T-handle is especially convenient when repeatedly opening and closing the clamp.
Keep the handle practical.
A very long handle may encourage excessive tightening and can interfere with surrounding work.
This is a holding tool—not a contest to see how much torque you can put into a threaded rod.
Step 9: Consider Adding a Pressure Pad
A plain screw end can work, but it concentrates force into a small contact area.
A better version can incorporate a small pressure pad at the bottom of the screw.
This increases the contact area and can reduce localized marking of the workpiece.
A swiveling pad is even more useful because it can seat against the curvature of the pipe while the screw continues rotating.
The design becomes slightly more complicated, but it can make the finished tool considerably nicer to use.
For pipe that must remain cosmetically clean or where material contamination is a concern, the contact surfaces and fabrication materials need additional consideration.
Step 10: Finish the Welds and Inspect Everything
Once you’re satisfied with the fit, complete the required welds.
Then clean the assembly.
Remove:
- Sharp edges
- Burrs
- Welding spatter
- Slag
- Cutting remnants
- Protrusions that could catch gloves or clothing
Inspect the shell around the welded nut and attachment points.
Check for obvious cracking, deformation, poor fit-up, damaged threads, or other defects.
Run the pressure screw completely up and down.
Then install the clamp on the jack without a workpiece and make sure it operates correctly.
Only after that should you test it progressively with pipe.
How to Use the Finished Clamp
Place the pipe onto the jack stand normally.
Position or close the fabricated clamp around the pipe.
Make sure the workpiece is sitting correctly in the stand before applying pressure.
Turn the handle until the screw contacts the pipe.
Then apply only enough additional pressure to restrain the workpiece for the intended operation.
You aren’t trying to crush the pipe.
You aren’t trying to bend it.
And you’re definitely not trying to turn the screw into a hydraulic press.
You’re simply removing unwanted movement.
That small amount of control can make fitting work much easier.
Where This Tool Becomes Useful
Imagine you’re fitting a long piece of pipe across multiple stands.
You establish your elevation.
You establish your orientation.
Then somebody starts working on the opposite end.
Without restraint, movement at one end can transfer down the entire piece.
A clamp on the appropriate stand can help control that movement during suitable fabrication operations.
It can also be useful when you’re checking:
- Measurements
- Orientation
- Fit-up
- Layout marks
- Flange position
- Component alignment
- Pipe rotation
For precision layout and alignment, a dependable level is another tool that frequently lives beside these homemade fixtures. Næxon also produces industrial tools and accessories through its Næxon Tools collection.
Build Different Sizes
There is no reason every clamp has to be identical.
A fabrication shop that regularly handles different pipe ranges could build several versions.
A smaller clamp can be lighter and easier to handle for small-bore work.
A larger heavy-duty version can provide the clearance required for larger pipe.
If you frequently fabricate stainless piping, you may also choose to build a dedicated version using appropriate stainless components and controlled contact surfaces to help prevent carbon-steel contamination.
That tool should be clearly identified and kept separate from carbon-steel fabrication equipment according to the shop’s material-control practices.
Don’t Confuse Holding With Rigging
This distinction is extremely important.
A homemade jack stand clamp should not automatically be treated as a rated lifting, hoisting, suspended-load, or rigging device.
Unless a device has been specifically engineered, tested, approved, and rated for those purposes, don’t assume that because it can hold something on a stand it can safely support a suspended load.
Use the tool for the workholding purpose for which it was designed and follow employer/site procedures.
The same principle applies to the jack stand itself: never exceed its rated capacity or use it contrary to the manufacturer’s instructions.
Never Depend on One Clamp for an Unstable Setup
The clamp doesn’t magically make a bad setup safe.
Pipe still needs adequate support.
Long pieces may require multiple stands.
Heavy components can change the center of gravity.
Elbows, valves, flanges, and fittings can create unexpectedly unbalanced loads.
Before loosening or tightening anything, think about where the weight wants to move.
Experienced industrial workers learn quickly that good fabrication isn’t only about making the fit. It’s about controlling the work throughout the process. That’s especially important during demanding maintenance and turnaround work, which Næxon covers in its guide to refinery turnarounds and maintenance outages.
Small Improvements That Make a Better Clamp
Once you’ve used the basic version, you’ll probably start thinking of improvements.
You could add a swiveling pressure foot.
You could fabricate replaceable contact pads.
You could add a retaining pin.
You could make the entire clamp removable.
You could build separate carbon-steel and stainless versions.
You could shorten or lengthen the handle.
You could make several shells for different pipe ranges.
That’s exactly how many field-fabricated tools evolve.
Version one solves the problem.
Version two solves it better.
And five years later, somebody else sees the tool sitting in your gang box and asks:
“Where did you buy that?”
That’s when you know you built something useful.
The Real Value of Shop-Fabricated Tools
Tools like this represent an important part of the skilled trades that rarely appears in textbooks.
A journeyman doesn’t only know how to use tools.
Eventually, he understands mechanical principles well enough to recognize when a simple tool can be created to solve a recurring problem.
A piece of scrap pipe isn’t always scrap.
A leftover nut isn’t always trash.
A short piece of threaded rod isn’t necessarily useless.
Put them together with the right idea and some fabrication knowledge, and suddenly you’ve created a tool that may stay on the job for years.
That mentality is part of what separates fabrication from simple assembly.
It’s also part of the broader industrial culture Næxon was built around: welders, pipefitters, boilermakers, millwrights, ironworkers, and the other tradespeople who solve problems every day. Explore more trade-focused articles in the Næxon Resources & Blog.
Final Thoughts
The homemade jack stand pipe clamp is about as blue-collar as a tool gets.
Start with scrap pipe.
Cut it into a curved saddle.
Fit it around the jack stand.
Create a centered opening at the top.
Weld on a heavy threaded nut or boss.
Install the threaded screw.
Add a handle.
Fit the clamp properly to the stand.
And you’ve transformed an ordinary pipe jack into a much more capable workholding station.
There’s nothing complicated about the concept.
The value comes from understanding why it works.
The jack provides the support. The curved body provides the frame. The threaded screw creates the clamping force. Together they restrain the pipe so the fitter can concentrate on making an accurate fit.
That’s old-school pipefitting ingenuity: use what you have, understand the forces involved, and build the tool you need.
Safety Note: This article describes a general shop-fabrication concept, not an engineered design specification. Material thickness, weld size, thread size, allowable load, stand capacity, fabrication procedure, inspection, and permitted use must be determined for the specific application by a qualified person and comply with employer, facility, manufacturer, and applicable safety requirements. Never use an unrated homemade clamp for lifting, hoisting, personnel support, or suspended loads.